How to create email templates for uniform client communication
Introduction
The CRM allows you to create an unlimited amount of pre-defined email templates which can be used in by the CRM users when emailing people, companies etc from the CRM.
When creating email templates you can insert various ‘Tags’ which will be replaced with actual data. For example, Let’s say you want to automatically insert a contact’s first name into an email. By using the $contact_firstname$ tag in an email template, the tag will be replaced by the contact’s actual first name automatically.
This allows you to quickly and easily personalise your emails with very little effort when using email templates.
How to create an email template
You will need administrator privileges to access email templates.
To access email templates
- Go to -> Settings -> Communication Templates -> Email Templates
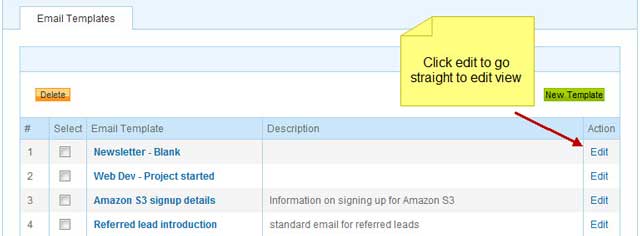
You’ll then see a list of all the existing email templates. To create a new email template do the following:
Creating a new email template
- Click the -> New Template button
- Enter a Name for the template. This will only be seen by the CRM users
- Enter a Description for the template. This will only be seen by the CRM users
- Choose a Folder for the template.
- Public – available to all CRM users
- Private – available to admin only
- Enter a Subject this will automatically populate the subject field when a user creates an email using the template
- Create your email using the text editor.
- When completed click -> Save
Personalising your email with tags
You can use the provided tags to personalise your email templates. There are a few important things to note here.
You can only use tags from one module. For example, you can NOT use tags from both the contacts module and accounts module. Since you are sending the email from either contacts or accounts you can only use fields available in those specific modules.
Inserting a tag:
- Place your cursor in the position that you want to insert the tag in your email body
- Select the module from the dropdown list
- Select the field you want to use from the second dropdown

Adding Attachments to your email
You can also attach documents, images and even files to your email templates. This a great feature if you’re sending out forms, brochures etc as part of your sales process.
When inserting attachments you can choose from 2 different types:
- Existing documents in your CRM
- Upload a file from your desktop
SIDE NOTE – When Uploading a file from your desktop the file will automatically be added to your CRM documents. This way it can be used over and over for future emails also.
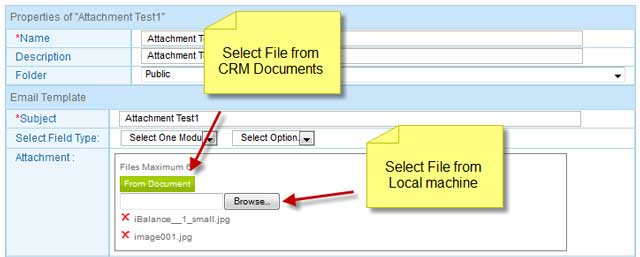
- In the attachments section select ONE of the two options:
- From Documents – This will use an existing CRM document
- Browse – Choose and upload a file from your local machine. this will also add the file to the Documents section of the CRM
- If selecting “From Documents” then choose the document you want to attach from the popup menu.
- If selecting “Browse” then find the file on your local machine and click -> Open

Edit an existing email template
Follow these steps to edit an existing template.
- Go to -> Settings -> Communication Templates -> Email Templates
- Click -> Edit in the template list view
- You are now in edit mode. edit the template as required
- Click -> Save once completed

